This article is intended to supplement (and not replace) the Knowledge Base articles for adding, editing, and copying to the map.
The Wildfire and Structure Preplan layers in Intterra provide the ability to create map-based plans for any area of your wildland or metro jurisdiction, then capture, record, and electronically share those plans with others. The primary value is to have a preplanned response plan that can be used for response operations, community education, and mitigation actions.
While some of the features are similar to incident features (i.e., water source, staging area, etc), these plans persist in Intterra while incident features are deleted (archived) when the incident is removed.
Have a Plan!
- The preplan layers have many feature types and even more information fields to collect information about added features.
- What's your current process for collecting and sharing preplan data? Is it working? How will Intterra compliment your current process?
- Consider developing a HowTo Guide and training plan for your agency if consistency is important to your agency.
Focus on the High Priority Data to Collect
Avoid creating a map with so much detail and information that the important information is lost. Focus on the ultimate driver - provide responders with access to the information they need, when they need it! Namely....
- How do I access the incident?
- What's in place to help me at the site?
- What hazards exist and, if available, where do I go to shut them off?
There are several ways to conduct pre-incident planning. The effort invested in gathering information for preplans varies across departments, ranging from quick and simple preplans to more complex ones like active shooter preplans that include detailed floor plans.. Click here for examples.
Focus on the High Priority Areas to Collect
- Building types? High-risk WUI communities?
- Can collection be done simultaneously with other assessments, such as structure risk, weed inspections, etc.?
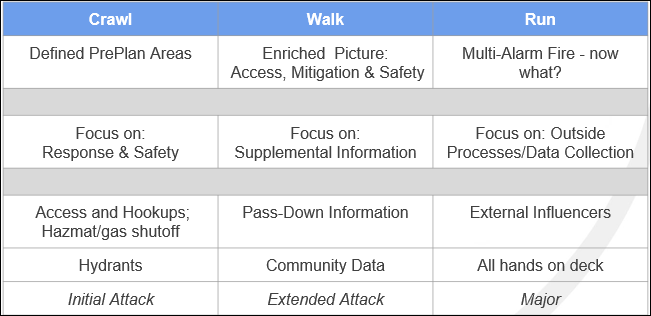
Consider a Crawl, Walk, Run Approach
Below is a table for Structure Preplans that targets what to collect, where to place additional focus, and discusses incident stage by collection stage.
Good Mapping Practices - Structure Preplans
Start by Adding a Preplan Area
- Use parcels to copy in a preplan area (rather than draw them by hand), if available. Check out Copy to the Map. If the layer is not currently in Intterra, or it is in a different workspace, check out Layers Menu to see how to add a layer from another source and make a layer available in all workspaces.
- If you do add manually, add footprints in the Vertex mode so that it is easier to draw straight lines. At a minimum, add a plan name to associate other plan features to your new plan, and add a label that will display on the map.
- Existing preplan PDF documents can be loaded to a preplan and made available in Intterra. You can add a Photos feature to the map and upload the plan file. Be sure to include a label that guides users to the plan.
TIP for assigning completing of preplan collection: add a "Needs Follow-up" Passdown Pin and label them with the crew/shift.
Building Footprints
Building footprints can be tedious to add in Intterra, but may be worth the effort because they provide a great place to capture important information, such as:
- Number of floors.
- Sprinkler coverage (which is symbolized on the map as full, partial, or no coverage).
TIPS for adding building footprints:
- If you have access to a building footprint layer or GIS data, these can be copied in as described in the Start by Adding Preplan Area section (above).
- If you do add manually, add footprints in the Vertex mode so that it is easier to draw straight lines.
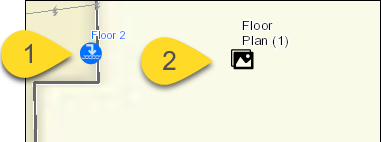
- Finally, existing floor plan PDFs can be added using the Photo feature. The advantage is that these are typically available and provide labeling. The disadvantage, however, is that they can't be viewed in the context of your active map with unit locations and other preplan mapping.
Mapping Tips
- Avoid creating a map with so much detail and information that the important information is lost. Follow local agency guidelines for consistency.
- Associate each feature with the Plan Area name.
- Add a Label Point feature to add labels to ID building units, hazards, information, and landmarks. This is especially helpful for building unit labels and assigning a floor number (so the text will display in different colors for each floor).
- Use the label field when adding features to place important text about that feature on the map (i.e., floor number).
- Use Access Hazards and Hazard Points to clear ID hazards. Add labels to show important information on the map so users don't have to click on the map to open the Info Panel. Access clearance is a good example of a useful label.
- Use the Photo feature to highlight specific hazards or supply an aerial oblique view (i.e., captured by a drone), if available.
- Use Pass Down Points to communicate important information to pass on to the next shift or CAD. Examples include: Issues to prevention, potential violations, missing or wrong keys, sprinklers that were turned off, information that deals with a response or needs to be handled after the fact, etc. Pass down points are meant to be temporary and display at a large view extent to garner attention until the item is dealt with.
- Other important features to add typically include Feature Shutoffs for utilities Key or Knox Box information.
Multiple Floors
At this point in time, you cannot view floors separately in Intterra. Every feature has a Floor Number question, however, so that information is stored in the database and users can export the data and create floor maps in GIS.
Here are ideas for how to handle multiple floors (3D) in Intterra (2D):
- Label each feature to designate which floor each feature pertains to within the system.
- Use a photo feature to add floor plans in the system for each floor. It's important to label these clearly.
Click here to view the Structure Preplan Symbology.
Good Mapping Practices - Wildfire Preplans
Start by Adding a Preplan Area
- You can use communities or watershed boundaries, or other layers to copy in as a preplan area (rather than draw them by hand). Check out Copy to the Map. If the layer is not currently in Intterra (or it is in a different workspace), check out Layers Menu to see how to add a layer from another source and make a layer available in all workspaces.
- At a minimum, add a plan name to associate other plan features to your new plan, and add a label that will display on the map.
- Existing preplan PDF documents can be loaded to a preplan so they are available in Intterra. Use the add photo capability to upload an existing plan in a PDF file to the Plan Area feature.
Mapping Tips
- Associate each feature with the Plan Area name.
- Add a Label the Map feature to add a label when there is not a specific feature to associate it with.
- Use the label field when adding features to place important text about that feature on the map so users can see it without having to click and view the Info Panel (i.e., bridge weight limit).
Monitor for Consistency
The key to having usable and consistent data is having a plan and ongoing monitoring of what is being collected.